Pushover Message API
Pushover uses a simple, versioned REST API to receive messages and broadcast them to devices running our device clients. To simplify the user registration process and usage of our API, there are no complicated out-of-band authentication mechanisms or per-call signing libraries required, such as OAuth. Standard HTTP libraries available in just about every language, or even from the command line, can be used without any custom modules or extra dependencies needed. See our Knowledge Base for examples in different programming languages.
To simplify the process of collecting user keys when sending to multiple users, we have a new Subscription API available.
TL;DR
- Register your application, set its name and upload an icon, and get an API token in return (often referred to as APP_TOKEN in our documentation and code examples).
-
POST an HTTPS request to
https://api.pushover.net/1/messages.jsonwith the following parameters:-
token- your application's API token (required) -
user- your user/group key (or that of your target user), viewable when logged into our dashboard; often referred to as USER_KEY in our documentation and code examples (required) -
message- your message (required)
-
attachment- a binary image attachment to send with the message (documentation) -
attachment_base64- a Base64-encoded image attachment to send with the message (documentation) -
attachment_type- the MIME type of the includedattachmentorattachment_base64(documentation) -
device- the name of one of your devices to send just to that device instead of all devices (documentation) -
html- set to1to enable HTML parsing (documentation) -
priority- a value of-2,-1,0(default),1, or2(documentation) -
sound- the name of a supported sound to override your default sound choice (documentation) -
timestamp- a Unix timestamp of a time to display instead of when our API received it (documentation) -
title- your message's title, otherwise your app's name is used -
ttl- a number of seconds that the message will live, before being deleted automatically (documentation) -
url- a supplementary URL to show with your message (documentation) -
url_title- a title for the URL specified as theurlparameter, otherwise just the URL is shown (documentation)
-
That's it. Make sure your application is friendly to our API servers and you're all set. For more information on each parameter, keep reading or jump to a section at the left.
Need help using our API or found an error in the documentation? Drop us a line.
Application Registration
To get started pushing notifications from your application, plugin, web service, server, or anything else, you'll first need to register it (a free process) to get an API token. You'll be able to set its name which will be used as a default title for messages, as well as upload an icon that will appear with each message in our device clients and notifications.
azGDORePK8gMaC0QOYAMyEEuzJnyUi
Application tokens are case-sensitive, 30 characters long, and may
contain the character set [A-Za-z0-9]. All API calls made
on behalf of your application must include this token.
If you are creating a client-side library, application, or open source project that will be redistributed and installed by end-users, you may want to require each of your users to register their own application rather than including your own API token with the software. See our Knowledge Base for more information.
Users, Groups, and Devices
Once you have an API token, you'll need the user key and optional device
name for each user to which you are pushing notifications.
If a device name is not specified for a user, or the specified device
name is no longer enabled/valid, notifications will be sent to all active
devices for that user to avoid losing messages.
Messages may be addressed to multiple specific devices by joining them
with a comma (such as device=iphone,nexus5).
Instead of a user key, a group key may be supplied. Group keys look identical to user keys and from your application's perspective, you do not need to distinguish between them. When sending notifications to a group key, all active users listed in the group will have the notification delivered to them and the response will look the same.
Alternatively, a message may be sent to multiple users in one request by
specifying a comma-separated list (with no spaces) of user keys as the
user parameter.
These requests are currently limited to 50 users in a single
request.
When sending to delivery groups not belonging to a Pushover for Teams
organization, or specifying multiple users in a single request, the
device parameter will be ignored. Group users will have
their specific device honored according to how they are entered in the
group.
When sending to a single Team-owned group, the
device name is honored, and will restrict sending
the message to just the team member devices matching the name in the
group.
If no devices match, the message will not be broadcast to any users and
the API will return a failure status.
As with application API tokens, user keys should be considered private and not disclosed to 3rd parties. Users should be able to update their identifiers and/or device names with your application or service.
Example User Identifier:
uQiRzpo4DXghDmr9QzzfQu27cmVRsG
Example Group Identifier:
gznej3rKEVAvPUxu9vvNnqpmZpokzF
Example User Device Name:
droid2
User and group identifiers are 30 characters long, case-sensitive, and
may contain the character set [A-Za-z0-9].
Device names are optional, may be up to 25 characters long, and will
contain the character set [A-Za-z0-9_-].
As an optional step, your application may validate user or group identifiers after they have been submitted to you. This will ensure that a user has copied his or her identifier properly, that the account is valid, and that there is at least one active device on the account.
Pushing Messages
Messages must contain a message parameter that contains the
message body and an optional title parameter. If the title
is not specified, the application's name will be shown by default. HTTP
and HTTPS URLs included in messages will be automatically parsed by the
device clients and shown as clickable links. To include a clickable link
outside of your message body, see the supplemental URL
documentation.
In this example, we will use the application token, user key, and device
name above to push a message about a completed process.
Using an HTTPS library available in your application's language, construct
a POST request (not a GET request which is
often the default) to the following URL:
https://api.pushover.net/1/messages.json
The .json suffix requests that the response be in JSON
format.
https://api.pushover.net/1/messages.xml may
be used instead to receive an XML response. Note that this does not
affect how you send your parameters to our server, which is controlled by
the Content-Type header you send with your input.
We do not support receiving XML-encoded parameters, only the standard
percent-encoding
that most HTTP libraries default to, and JSON with a
Content-Type of application/json.
HTTPS is required for all API calls, and for security purposes, your application should enable your HTTP library's TLS/SSL verification. The POST method is required be used for the API call to push messages.
Include the token, user, device
(optional), title (optional), and message
parameters in the body of the request as standard key-value pairs.
Continuing with our example, these parameters would be:
token = azGDORePK8gMaC0QOYAMyEEuzJnyUi
user = uQiRzpo4DXghDmr9QzzfQu27cmVRsG
device = droid4
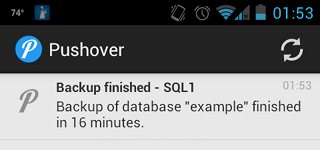
title = Backup finished - SQL1
message = Backup of database "example" finished in
16 minutes.
Those parameters would look like this when POSTed as a URL-encoded (also known as percent-encoded) request:
POST /1/messages.json HTTP/1.1
Host: api.pushover.net
Content-Type: application/x-www-form-urlencoded
Content-Length: 180

token=azGDORePK8gMaC0QOYAMyEEuzJnyUi&user=uQiRzpo4DXghDmr9QzzfQu27cmVRsG&device=droid4&title=Backup+finished+-+SQL1&message=Backup+of+database+%22example%22+finished+in+16+minutes.
That message would appear like this in the Pushover client on an Android device:
HTML/Message Styling
As of version 2.3 of our device clients, messages can be formatted with HTML tags. As of version 3.4, messages can be formatted with a monospace font.
To enable HTML formatting, include an html parameter set to
1. The normal message content in your message
parameter will then be displayed as HTML.
To enable monospace messages, include a monospace parameter
set to 1. monospace may not be used if
html is used, and vice versa.
Due to limitations with notifications on mobile platforms, HTML tags and monospace formatting are stripped out when displaying your message as a notification (leaving just the plain text of your message). Once the device client is opened and your message has been downloaded from our server, it will be displayed with appropriate HTML or monospace formatting.
HTML tags currently supported:
<b>word</b>- display word in bold<i>word</i>- display word in italics<u>word</u>- display word underlined<font color="#0000ff">word</font>- display word in blue text<a href="http://example.com/">word</a>- display word as a tappable link to http://example.com/
Specifying a Message Time
Messages are stored on the Pushover servers with a timestamp of when they were initially received through the API. This timestamp is shown to the user, and messages are listed in order of their timestamps. In most cases, this default timestamp is acceptable.
In some cases, such as when messages have been queued on a remote server
before reaching the Pushover servers, or delivered to Pushover out of
order, this default timestamping may cause a confusing order of messages
when viewed on the user's device. For these scenarios, your app may send
messages to the API with the timestamp parameter set to the
Unix timestamp of
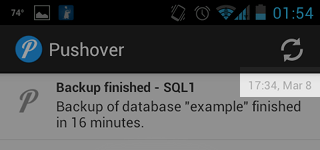
the original message. For example, sending
timestamp=1331249662 would deliver the message with a time
of March 8, 2011 17:34:22 CST (but shown relative to the local device's
timezone).
Message Priority
By default, messages have normal priority (a priority of
0). Messages may be sent with a different priority that
affects how the message is presented to the user. Please use your best
judgement when sending messages to other users and specifying a message
priority. Specifying a message priority does not affect queueing or
routing priority and only affects how device clients display them.
Lowest Priority (-2)
When the priority parameter is specified with a value of
-2, messages will be considered lowest priority and will not
generate any notification. On iOS, the application badge number will be
increased.
Low Priority (-1)
Messages with a priority parameter of -1 will
be considered low priority and will not generate any sound or vibration,
but will still generate a popup/scrolling notification depending on the
client operating system. Messages delivered during a user's quiet hours
are sent as though they had a priority of (-1).
Normal Priority (0)
Messages sent without a priority parameter, or sent with the
parameter set to 0, will have the default priority. These
messages trigger sound, vibration, and display an alert according to the
user's device settings. On iOS, the message will display at the top of
the screen or as a modal dialog, as well as in the notification center.
On Android, the message will scroll at the top of the screen and appear
in the notification center.
If a user has quiet hours set and your message is received during those
times, your message will be delivered as though it had a priority of
-1.
High Priority (1)
Messages sent with a priority of 1 are high
priority messages that bypass a user's quiet hours. These messages will
always play a sound and vibrate (if the user's device is configured to)
regardless of the delivery time. High-priority should only be used when
necessary and appropriate.
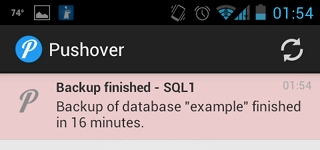
High-priority messages are highlighted in red in the device clients.
Emergency Priority (2)
Emergency-priority notifications are similar to high-priority notifications, but they are repeated until the notification is acknowledged by the user. These are designed for dispatching and on-call situations where it is critical that a notification be repeatedly shown to the user (or all users of the group that the message was sent to) until it is acknowledged. The first user in a group to acknowledge a message will cancel retries for all other users in the group.
Applications sending emergency notifications are issued a receipt that can be used to get the status of a notification and find out whether it was acknowledged, or automatically receive a callback when the user has acknowledged the notification.
To send an emergency-priority notification, the priority
parameter must be set to 2 and the retry and
expire parameters must be supplied.
The retry parameter specifies how often (in seconds) the
Pushover servers will send the same notification to the user. In a
situation where your user might be in a noisy environment or sleeping,
retrying the notification (with sound and vibration) will help get his or
her attention. This parameter must have a value of at least 30 seconds between retries.
The expire parameter specifies how many seconds your
notification will continue to be retried for (every retry
seconds). If the notification has not been acknowledged in
expire seconds, it will be marked as expired and will stop
being sent to the user. Note that the notification is still shown to the
user after it is expired, but it will not prompt the user for
acknowledgement. This parameter must have a maximum value of at most
10800 seconds (3 hours), though the total number
of retries will be capped at 50 regardless of
the expire parameter.
For example, sending a retry parameter of 60
and an expire parameter of 1800 will cause your
notification to be retried every 60 seconds for 30 minutes.
A retry parameter of 30 and an
expire parameter of 10800 will retry every 30 seconds up to
25 minutes due to the cap
of 50 retries.
The optional callback parameter may be supplied with a
publicly-accessible URL that our servers will send a request to when the
user has acknowledged your notification.
When your application sends an emergency-priority notification, our API
will respond with a receipt value that can be used to get
information about whether the notification has been acknowledged. See
our receipts and callbacks section for more
information.
If your application is not capable of storing receipt
identifiers, you can send a tags parameter of
comma-separated, arbitrary tags which will be stored with the receipt on
our servers. You can then use the cancel_by_tag API call to cancel
all receipts with a specific tag.
Time to Live
Normally a message delivered to a device is retained on the device until it is deleted by the user, or is automatically deleted when the number of messages on the device exceeds the user's configured message limit.
The ttl parameter specifies a Time to Live in seconds, after
which the message will be automatically deleted from the devices it was
delivered to.
This can be useful for unimportant messages that have a limited
usefulness after a short amount of time.
The ttl parameter is ignored for messages with a
priority value of 2.
The ttl value must be a positive number of seconds, and is
counted from the time the message is received by our API.
Time to Live functionality requires at least version 4.0 of our iOS and Android apps. Due to limitations on iOS and iPadOS, expired notifications may not be removed automatically from Notification Center until another notification arrives and allows for processing time to expire currently-showing notifications.
Supplementary URLs
The Pushover device clients automatically turn URLs found in message bodies into clickable links that open in the device's browser (or whichever application is configured to handle them). It may be desirable to include a supplementary URL that is not included in the message text, but available for the user to click on. This URL will be passed directly to the device client, with a URL title of the supplied title (defaulting to the URL itself if no title given). Supplementary URLs can be useful for presenting long URLs in a notification as well as interacting with 3rd party applications.
For example, if a Pushover application were sending Twitter messages to
a user, a supplementary URL may be sent that includes the actual link to
the message that would open in the user's browser (e.g.,
http://twitter.com/user/status/12345) or a URL that will
perform some action in another application installed on the device (e.g.,
twitter://status?id=12345). The message displayed in the
Pushover client would be the actual contents of the Twitter message (with
any URLs originally contained in it automatically turned into links), but
the supplementary link will be shown underneath it as an option available
to the user when the message is highlighted. An example request to our
API might have the following parameters:
token = azGDORePK8gMaC0QOYAMyEEuzJnyUi
user = uQiRzpo4DXghDmr9QzzfQu27cmVRsG
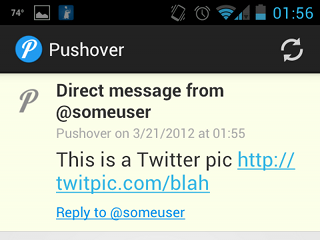
message = This is a Twitter pic
http://twitpic.com/blah
title = Direct message from @someuser
url = twitter://direct_message?screen_name=someuser
url_title = Reply to @someuser
This message would appear in a Pushover device client like so:
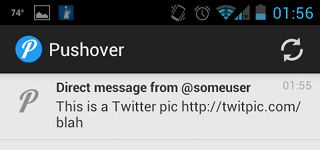
When the user taps on the notification in Pushover to expand it, the URL
will be shown below it with the supplied url_title
parameter, titled "Reply to @someuser", which when clicked, will launch a
Twitter application that is set to handle the URL
twitter://direct_message link?screen_name=someuser.
While there are some standard URL schemes like tel: and
sms: that will be handled by iOS and Android the same way,
others like the twitter:// scheme used above are highly
specific to the platform and other applications installed on the device.
Since Pushover users may be on different platforms and have different 3rd
party applications installed, it is not recommended to use app-specific
URL schemes as supplementary URLs in public plugins, websites, and apps.
Notification Sounds
Users can choose from a number of different default sounds to play when receiving notifications, rather than our standard Pushover tone. Applications can override a user's default tone choice on a per-notification basis.
When sending notifications through the Pushover API, the
sound parameter may be set to one of the following built-in
sounds:
pushover- Pushover (default)
bike- Bike
bugle- Bugle
cashregister- Cash Register
classical- Classical
cosmic- Cosmic
falling- Falling
gamelan- Gamelan
incoming- Incoming
intermission- Intermission
magic- Magic
mechanical- Mechanical
pianobar- Piano Bar
siren- Siren
spacealarm- Space Alarm
tugboat- Tug Boat
alien- Alien Alarm (long)
climb- Climb (long)
persistent- Persistent (long)
echo- Pushover Echo (long)
updown- Up Down (long)
vibrate- Vibrate Onlynone- None (silent)
Note: As of April 2021, our apps now support
custom
sounds in addition to the built-in sounds above.
Each user can upload their own sounds through our website and specify
them as the sound parameter.
Applications sending messages to other users can specify sounds uploaded
to the account that owns the application and it will play the custom
sound for all users to which the message was sent.
If no sound parameter is specified, the user's default tone
will play. If the user has not chosen a custom sound, the standard
Pushover sound will play.
In most cases, applications choosing to override the default sound should
offer the user the option to pick a sound from the list returned by
making a GET request to our sounds API:
https://api.pushover.net/1/sounds.json?token=(your app
        token)
Include your application's token as the token parameter.
This API call returns a sounds hash with each key being the
actual sound parameter to store for the user and send to our
API, with its value describing the sound.
This list will include the defaults above, in addition to any custom
sounds that have been uploaded to the account owning the application/API
token.
Note: In addition to the list of sounds from our API,
your application must provide a blank option to the user that will
not send the sound parameter to our API (or send it with a
blank value). This will allow the user's default tone to play, rather
than being overridden by your application.
Attachments
As of version 3.0 of our iOS, Android, and Desktop apps, Pushover messages can include an image attachment. When received by a device, it will attempt to download the image and display it with the notification. If this fails or takes too long, the notification will be displayed without it and the image download can be retried inside the Pushover app. Note that, like messages, once attachments are downloaded by the device, they are deleted from our servers and only stored on the device going forward. Attachments uploaded for devices that are not running at least version 3.0 of our apps will be discarded as they cannot be displayed by those devices.
Attachment files must be directly sent to our API with your other message parameters and cannot be included as a URL or other parameter that would instruct our servers or the device clients to download the file. This is done for efficiency and for the privacy of our users to avoid making requests to non-Pushover URLs without their knowledge.
Each message may only include one attachment, and attachments are currently limited to 2,621,440 bytes (2.5 megabytes). Attempting to send attachments larger than this size will be rejected with an API error (or server error for extremely large file attempts). Any resizing of images to fit under this limit must be done on the sending side before making the API request.
Attachment data may be sent in two different ways.
For HTTP clients and libraries supporting
multipart/form-data HTTP bodies, the attachment may be sent
directly as binary data, including its content type in the parameter.
See the
Attachments - multipart/form-data
section for instructions.
For HTTP clients that don't support multipart/form-data but
where Base64 encoding is available, the attachment may instead be sent as
the attachment_base64 parameter.
See the
Attachments - Base64 section for
instructions.
Attachments - multipart/form-data
While all other API parameters may be sent using standard
application/x-www-form-urlencoded encoding (the default for
most HTTP libraries), including an attachment this way requires sending
parameters using multipart/form-data encoding which not all
HTTP libraries support.
Consult the documentation for your library to see whether it supports
this and how to send parameters using this encoding.
If it is not supported, see the Base64
option.
When including the attachment parameter, it must include the
Content-Disposition and Content-Type
sub-headers which provide metadata about the attachment being uploaded
including its original filename (as the name="file.jpg"
parameter of the Content-Disposition header) and the type of
image such as image/jpeg. This should all be handled by
your HTTP library so most users will not have to worry about these
details, but the raw request data will look something like this:
[other HTTP headers]
Content-Type: multipart/form-data; boundary=--abcdefg

----abcdefg
Content-Disposition: form-data; name="user"

[ your Pushover user key ]
----abcdefg
Content-Disposition: form-data; name="token"

[ your Pushover API token ]
----abcdefg
Content-Disposition: form-data; name="message"

your message here
----abcdefg
Content-Disposition: form-data; name="attachment"; filename="your_image.jpg"
Content-Type: image/jpeg

[ raw binary data of image file here ]
----abcdefg--
Examples of how to send image attachments can be found in our Knowledge Base for curl and Python.
Attachments - Base64
If your HTTP library does not support sending the binary attachment data
directly as
multipart/form-data,
but you do have a
Base64 encoding
function/library available, you can send the binary attachment data as a
Base64-encoded string as the attachment_base64 parameter.
Since the MIME type will not be sent as it is with
multipart/form-data, the MIME type must also be sent as the
attachment_type parameter (e.g., image/jpeg).
Note that Base64-encoding binary data can increase its size by nearly 35%, so your HTTP request will be that much larger.
Response Format
If your POST request to our API was valid, you will receive an HTTP 200
(OK) status, with a JSON object (or XML stanza if you specified a URL
ending in .xml) containing a status code of
1.
{"status":1,"request":"647d2300-702c-4b38-8b2f-d56326ae460b"}
If any input was invalid, you will receive an HTTP 4xx
status, with a JSON object or XML node containing a status
code of something other than 1, and an errors array
detailing which parameters were invalid.
{"user":"invalid","errors":["user identifier is
        invalid"],

        "status":0,"request":"5042853c-402d-4a18-abcb-168734a801de"}
If you sent a priority=2 notification, you will also receive
a receipt parameter in your response that can be used with
our receipts API.
The request parameter returned from all API calls is a
randomly-generated unique token that we have associated with your
request. If you need to contact us about a
question or problem with our API, please include this
request parameter that our API returned so we can look up
your original request in our logs.
Limitations
Messages are currently limited to 1024 4-byte UTF-8 characters, with a title of up to
250 characters.
Supplementary URLs are limited to 512 characters, and URL
titles to 100 characters.
Applications are permitted to send 10,000
messages per month for free, with one team-owned
application permitted to send 25,000
messages per month for free, where one message is defined as a successful
messages API call to one user, regardless of the number of
devices on that user's account. Messages sent to group keys are counted
as one message for each user in the group.
If your application needs a higher message limit, please see our Knowledge Base for more information. For open source applications, see our article about distribution of your API token.
Once message limits have been reached, requests will be rejected with a
429 HTTP status code. Message limits are reset at
00:00:00 Central Time on the 1st of each month. Per-day and
per-month usage statistics can be viewed on each application's page, as well as through HTTP
headers returned in each API call to the messages endpoint
showing your app's monthly message limit (plus any additional purchased
capacity), the number of messages sent this month, and the Unix timestamp
of when the count will reset.
X-Limit-App-Limit: 10000X-Limit-App-Remaining: 7496X-Limit-App-Reset: 1393653600
In addition to returning headers with each message request, a dedicated
API endpoint is available to return these limits in the result body as
limit, remaining, and reset. This
endpoint can be used by making a GET request to:
https://api.pushover.net/1/apps/limits.json?token=(your app
        token)
Include your application's token as the token parameter.
Once a message is verified to have been delivered to a device (which
happens after the client on the device is opened and a sync over HTTPS is
performed, not just after the message is delivered to Apple/Google
carrier servers), the message is deleted from the Pushover servers.
Messages not verified to have been received will be deleted after
21 days of being sent to carrier servers. Messages are
delivered to and stored on each device separately and are not viewable
from the Pushover website or any other device, unless those messages have
also been pushed to those devices through the API.
Being Friendly to our API
When creating an application that will use our API, please consider that your message may not go through for various reasons. We may be having temporary technical difficulties, your application might have exceeded its monthly quota, or the user you are sending to may have deactivated their account.
The key to being friendly to our API is to pay attention to how it responds:
- If we issue a 200 HTTP response and the
statusparameter in the JSON/XML body is1, your notification has been received and queued. Well done. - If we issue a 4xx HTTP response, or the
statusparameter is not1, your input was invalid. Either your application is over its quota, your token is invalid, a user is no longer active, you are not sending a required parameter, etc. Parse the JSON/XML response, noting theerrorsarray if present, and take the appropriate response for your type of message. The important part is that repeating your same request will not work, no matter how many times you retry it. Your input needs to be changed, you need to purchase additional message capacity for your application, or you need to stop retrying. - If we issue a 500 or any other HTTP response, you were unable to connect to our API, or you did not get a reply, it means we are having temporary problems. You can repeat your same request again, but no sooner than 5 seconds from your last request. If we're having temporary difficulties, flooding our servers with repeated requests will just make the problem worse for everyone.
Your application should implement basic rate limiting. Do not send more than 2 concurrent HTTP requests (TCP connections) to our API, or we may do rate limiting on our side which may cause timeouts and refused connections for your IP. To speed up multiple requests, you should send each request in sequence over the same TCP connection using HTTP keep-alive to avoid the overhead of a new TCP connection and TLS negotiation.
If your application fails to act in a sane manner and sends many failed requests that result in 4xx responses within a few minutes, your IP will be automatically blocked for a temporary period. This period is automatically extended if your IP continues to send bad requests after being unblocked.
User/Group Validation
As an optional step in collecting user keys for users of your application, you may validate those keys to ensure that a user has copied them properly, that the account is valid, and that there is at least one active device on the account. User and group identifiers may be validated by POSTing an HTTPS request to:
https://api.pushover.net/1/users/validate.json
Include your application's token as the token parameter, the
user's or group's identifier as the user parameter, and an
optional device parameter. If the device
parameter is supplied, the validation will apply to that user and
device. If the parameter is not supplied, a user will be validated if
there is at least one active device on the account.
The validate call returns a response
with status set to 1 if the user is valid and
has at least one active device to send to.
The response will also contain a devices array containing
the names of the user's active devices and a licenses array
containing the platforms the account is licensed for. If the user and/or
device is not valid, status will be set to 0,
optionally with a parameter detailing a specific error.